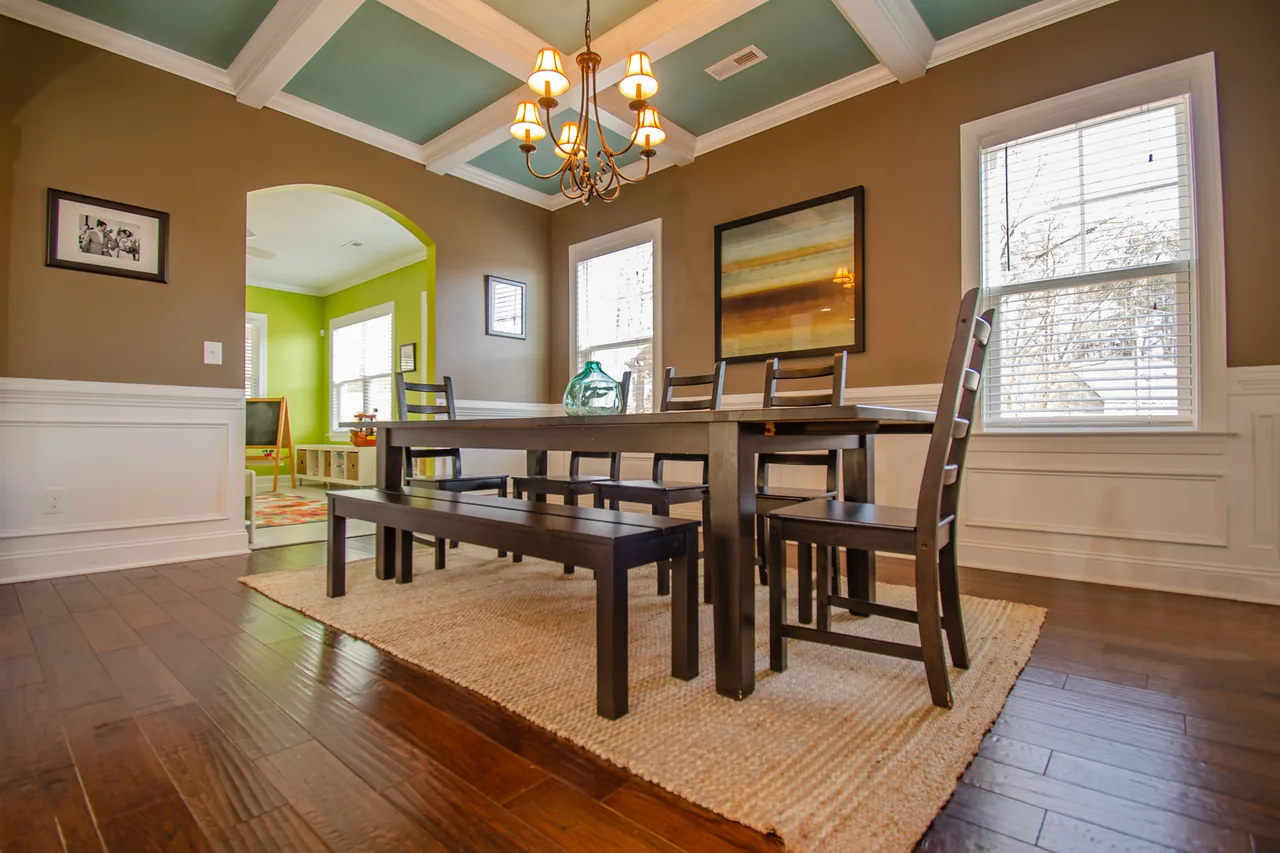
A coffered ceiling is a grid of recessed panels framed by a lattice of beams, turning a flat overhead plane into a field of sunken boxes that read as depth, shadow, and craft. Two measurements decide whether it belongs in your room and almost nothing else does: the ceiling height it starts from and the depth the beams project down. Below roughly 9 ft the grid closes in and the room feels lower, not grander; above it, with beam depth proportioned to the height, the coffers earn their space. Get a free consultation and a written, itemized scope from a vetted installer who measures the height and maps the joists before designing the grid — that planning, not the catalog photo, is where a coffered ceiling is decided.
A Coffered Ceiling Is a Height-and-Structure Job First, a Trim Job Second
The molding and the panel detail everyone admires matter least to whether a coffered ceiling looks designed or crammed in. What separates a grid that reads as architecture from one that reads as a low-hanging cage is the measured height and structural work decided before the first beam goes up.
Ceiling Height Decides Whether the Grid Can Exist at All
Because every beam projects downward, a coffered grid subtracts from headroom, so the starting height dictates what is possible and the design only decides what it looks like inside that constraint:
- A deep solid-lumber grid on an 8 ft ceiling drops the apparent plane several inches at every beam and reads as a cage, not recessed panels.
- A grid laid out without measuring leaves slivers of half-coffers crashing into the walls and beams that miss the windows.
- A heavy real-wood grid fastened into drywall alone, with no blocking, sags and pulls its joints open over the first humid season.
None of those are product defects — they are planning and structural failures, the most common reasons a coffered ceiling disappoints, and every one is decided before the trim is even ordered.
The Order of Operations Never Changes Across Systems
Structure and layout, then beams, then finish. That sequence holds whether the grid is built from solid lumber, hollow box beams, or a polyurethane kit. The work before the beams is always the same: measure the true ceiling height, locate the joists and confirm their direction, add blocking where beams run perpendicular, chalk the full grid and balance it to the room, then choose a system the ceiling height and structure can carry. The look — stained or painted, deep or shallow, plain or panel-molded coffers — happens inside those facts, not before them. This is precision millwork overhead, closely tied to broader ceiling installation, and the order is what keeps the grid flat, square, and solid.
The Coffered Readiness Gate: Six Checks Before Any Beam Goes Up
Before a single beam is fastened, a competent installer runs the room through the same six-check gate. Each check has a measurable answer, each is a documented cause of a failed or crammed-in grid when skipped, and a room that fails any one is not ready for the grid as drawn. Call it the Coffered Readiness Gate: pass all six and the ceiling has the height, structure, and layout to look intentional; fail one and you are buying a low feel or a sagging joint.
- 1. True ceiling height
- The finished height is measured, not assumed, because the grid wants a starting ceiling of at least 9 ft to give back the headroom it takes. On a standard 8 ft ceiling only the shallowest decorative grid is advisable, and many designers steer those rooms to a single tray or a flat treatment instead. The height is the gatekeeper every other decision answers to.
- 2. Joist direction and structural capacity
- The ceiling joists are located and their direction confirmed, because beams running perpendicular to the joists can anchor into them while beams running parallel need blocking added between joists to fasten into. A real-lumber grid adds genuine dead load that must transfer into structure; knowing what is above decides which system is even feasible.
- 3. Ceiling flatness
- The existing ceiling is checked for dip and wave the way a subfloor is checked for flatness, because a ceiling that sags will throw the grid out of true and leave beams with uneven reveals. High and low spots are shimmed or furred so the beams land on a flat plane, since a wavy ceiling telegraphs through a grid as surely as it does under a floor.
- 4. Grid layout and symmetry
- The full grid is chalked onto the ceiling and adjusted until beams land symmetrically against the walls, align with key windows and the room's center, and avoid thin partial coffers at the borders. This is a measured layout exercise, not an eyeballed one — beam spacing, beam width, and coffer size are calculated against the room's real dimensions before anything is cut.
- 5. Beam depth proportioned to the room
- The beam depth is chosen against the ceiling height and coffer size, not off a shelf. Beams too shallow read as applied trim with no shadow; beams too deep on a modest ceiling eat the room. The right depth gives the recess illusion enough shadow to read as architecture while leaving the headroom the height can spare.
- 6. System and finish match
- The construction system — solid lumber, hollow box beam, or polyurethane kit — is confirmed against the ceiling's height, structure, and the finish you want before any of it is ordered. A stainable natural-wood grid means real lumber and demands structure to carry it; a clean painted grid suits lightweight box beams; a low-load decorative result forgives a kit. Matching the system to the room is what makes the other five checks count.
Three of these six — height, structure, and layout — are the corners cut on a rushed coffered job, because measuring and balancing the grid costs design hours a fast quote skips, yet every one is checkable before a beam is cut. That is why the gate is non-negotiable.
Want the height and structure checked before you design a grid?
We match you with a vetted installer who measures the ceiling, maps the joists, and balances the grid layout — and puts it in a written scope before a beam is ordered.
Coffered Ceiling Specifications & What Actually Gets Rated
Coffered ceilings are not graded on a hardness or wear scale the way flooring is — the specs that decide one are dimensional and structural, and they are what separate a grid that looks designed from one that looks crammed in. The numbers run from the controlling constraint, ceiling height, through beam geometry to the dead load the structure has to carry.
Ceiling Height and Headroom Loss
Ceiling height is the spec that decides whether a coffered grid is even advisable, because the recess illusion needs the eye to travel up into the box and a short ceiling never gives it the room. How much height you can spare governs everything downstream.
The 9-Foot Threshold
The depth and presence of a coffered grid want a starting ceiling of at least 9 ft, and the taller the ceiling, the deeper and more dramatic the beams can be without stealing usable headroom. The threshold is not arbitrary: it is the height at which a meaningful beam depth can drop the plane at the beams and still leave the room reading tall rather than low.
Why 8-Foot Ceilings Fight the Grid
On a standard 8 ft ceiling, a beam depth that would read as substantial elsewhere pulls the finished plane down to a height felt immediately underfoot — the coffers look like a low cage rather than recessed panels. Only the shallowest decorative grid is advisable there, and the honest call is often a single tray, a flat treatment, or a different surface entirely.
Beam Depth as a Share of Headroom
The beam depth is read against the height it consumes: a deeper beam casts a stronger shadow and reads more architectural, but every inch of projection is an inch of headroom gone at the beams. The right depth maximizes shadow within the height the room can spare, which is exactly the proportion judgment a planning-first installer brings instead of pulling a stock beam off a shelf.
Beam Geometry: Depth, Width, and Spacing
Beam geometry sets the scale and the shadow, and all three dimensions are proportioned to the room rather than chosen from a default. Beams too shallow read as applied trim; beams too deep on a modest ceiling eat the room; beams spaced without regard for the walls leave partial coffers crashing into the borders. The grid is calculated so beams land symmetrically against the walls, align with key windows and the room's center, and resolve cleanly at the perimeter — a measured layout, not an eyeballed one.
Dead Load and Structural Attachment
Dead load is the structural spec that decides which system is feasible. A real-lumber grid adds genuine weight overhead, and that dead load has to transfer into the ceiling joists, not the drywall. Beams fastened into drywall alone, or into joists running the wrong way without blocking, are how a heavy grid sags, opens its joints, or in the worst case lets go. Lightweight box-beam and polyurethane systems cut the load dramatically, which is why the joist direction and structural capacity overhead decide the system before the look does.
Coffered Ceiling Specifications, by System
The table below collects the dimensional and structural factors a competent installer verifies across the three honest ways to build a coffered ceiling. These are representative relationships, not fixed numbers — the room's real height and structure always govern.
| System | Relative dead load | Attachment requirement | Finish | Refinishable | Best-fit ceiling |
|---|---|---|---|---|---|
| Solid / dimensional lumber | Highest | Anchored into joists + blocking where beams run perpendicular | Stain or paint | Yes — sandable wood | Tall, structurally sound, want authentic depth |
| Hollow box beam (MDF/paint-grade) | Moderate | Box slips over a fastened cleat or ledger into structure | Paint-grade | Repaint only | Want a clean painted grid with less load |
| Polyurethane / faux kit | Lowest | Glue-and-pin to a flat plane, minimal structural demand | Paintable, moisture-tolerant | Repaint only | Lower ceiling or weaker structure, decorative only |
The lesson is that the system is chosen for the ceiling, not the other way around: a stainable natural-wood grid forces real lumber and demands structure to carry it, while a polyurethane kit forgives a weaker ceiling but gives the least depth and cannot be stained. Size the planning against what is above before falling for a finish, and compare what each route costs in our cost guides.
Coffered vs. Beamed, Tray, and Panel Ceilings Compared
Several overhead treatments get grouped together, and choosing among them is as consequential as the beam finish, because each solves a different problem — recessed cells, exposed structure, a single stepped recess, or a fast decorative cover. The right one is dictated by the ceiling height and the look, never by which is cheapest.
The Overhead-Treatment Comparison Matrix
The matrix below is the decision the installer is helping you make — depth, headroom effect, planning demand, and where each belongs, side by side.
| Treatment | Defining feature | Effect on headroom | Planning demand | Relative cost | Best when |
|---|---|---|---|---|---|
| Coffered | Full grid of recessed boxes, beams both directions | Subtracts at every beam | Highest — measured layout | Highest | Flat, tall ceiling, want depth and craft |
| Beamed | Beams one direction, flat ceiling between | Subtracts at the beams only | Moderate | Moderate | Want structure and warmth, not boxed geometry |
| Tray (recessed) | Single stepped center recess | Adds apparent height | Moderate | Moderate | Want to feel taller, not lower |
| Panel / coffered-look kit | Molded panels mimicking depth on a flat plane | Minimal | Low | Lowest | Want the look fast, low headroom cost |
A simple beamed ceiling runs beams in one direction with the flat ceiling left between them — structure and warmth without the boxed-in geometry, and the natural overlap with a plank-and-beam wood ceiling. A tray ceiling lifts the center into a recess bordered by one perimeter ledge, so it adds height rather than subtracting it — the opposite move from a coffer. A panel ceiling, whether tin, PVC, or a coffered-look kit, mimics depth with molded panels on a flat plane; see ceiling panels for that route when you want the look without the framed depth or the headroom cost.
When None of These Is the Answer
If the goal is sound rather than style — taming echo in a tall, hard room — none of these treatments solves it, and an acoustic ceiling of panels, baffles, or clouds belongs in the conversation instead. And if the room follows the roofline rather than capping flat, a vaulted ceiling changes the question entirely. These all sit within the broader field of home surfaces, and the ceilings hub lays out where each fits, including coordination with the walls below.
Types of Coffered Ceiling — Real Lumber, Box Beam, and Kits
There are three honest ways to build a coffered ceiling, and they trade off depth and permanence against weight, speed, and cost. The grades section links the related ceiling routes where each overlaps, so you can follow the system that fits your structure.
Solid and Dimensional Lumber Grids
Beams built from real wood — often a hardwood or paint-grade poplar, hollow-boxed to manage weight — fastened into the ceiling structure. This is the most substantial, the most authentic, and the most labor-intensive route, and the only one that yields a stained, natural-wood grid that can be sanded and refinished. It carries the most dead load and demands the most attention to attachment, anchoring into joists and blocking rather than drywall.
Hollow Box Beam Grids
Beams fabricated as hollow three-sided boxes — typically MDF or paint-grade material — that slip over a fastened cleat or ledger. They look like solid beams from below but weigh a fraction as much, install faster, and reduce the structural burden. They are paint-grade by nature, so this is the route for a clean, painted coffered grid where natural wood is not the goal.
Polyurethane and Faux Kit Systems
Pre-molded high-density polyurethane beams and corner pieces, or full coffered kits, that glue and pin to a flat ceiling. They are the lightest and fastest, install with minimal structural concern, take paint, and resist moisture better than wood — but they offer the least depth and cannot be stained to a true wood look. For a purely decorative, low-load result, a kit-based system overlaps heavily with the ceiling panel approach, and a coffered-look panel may serve the same goal with even less work.
What Fills the Coffer
Beyond the beams, the inside of each coffer is its own decision: left as flat painted drywall, dressed with panel molding for added depth, finished with a wood panel, or lit with concealed LED to wash the recess. Those choices push a coffered ceiling from understated to formal, and they are where the design personality lives — but they ride on top of a grid whose system was already chosen for the room's height and structure.
Why Coffered Ceilings Read Low, Crash, or Sag — and How the Build Stops It
The disappointments with a coffered ceiling trace back to a short list of decisions made before the trim, and each is preventable at the layout-and-structure stage — paired below with its mechanism, cause, and named prevention.
Height Starvation: A Grid That Reads as a Cage
Height starvation is the most common failure: because every beam projects downward, a grid on a ceiling that is too short pulls the apparent plane down and the coffers read as a low-hanging cage rather than recessed panels. It is almost always a height that was never honestly measured against the beam depth. The prevention is upstream — confirm the 9 ft threshold, proportion the beam depth to the height that exists, and choose a tray or flat treatment when the room simply cannot spare the drop.
Bad Proportion: A Pattern That Feels Off
Bad proportion is the second: a grid laid out without regard for the room's dimensions leaves slivers of half-coffers crashing into walls, beams that miss the windows and doors, and a pattern that feels wrong without the viewer knowing why. That is a layout failure — the grid was stamped onto the room instead of calculated for it. The prevention is a measured layout exercise: beam spacing, width, and coffer size calculated against the room so the grid lands symmetrically and the borders resolve cleanly.
Sag and Joint Failure: A Weight-and-Attachment Problem
Sag and opened joints are the structural signature: a real-lumber grid adds dead load that, fastened into drywall alone or into joists running the wrong way without blocking, pulls down, opens its mitered joints, or lets go entirely. The prevention is locating the joists, adding blocking where beams run perpendicular, and anchoring every beam into structure — or choosing a lightweight box-beam or kit system that sidesteps the load.
Hairline Cracks and Striping: A Movement-and-Finish Problem
The fourth disappointment — hairline cracks at caulked joints or a striped look where a stained grid moves — is a movement-and-finish problem. Caulked and filled joints can crack over the first year or two as the house and millwork settle, especially in homes with seasonal humidity swings; re-caulking and a touch of paint closes them. A stained, real-wood grid that opens slightly can reveal raw wood at the joints if it was finished after assembly. The prevention is finishing real-wood components before final assembly and treating the grid as one piece of millwork. If a grid has already failed structurally, the path is diagnosis-first ceiling repair rather than a cosmetic patch over a sagging beam.
Common Coffered Ceiling Mistakes, Consequences, and Prevention
Most coffered disappointments are the same handful of shortcuts, each with a predictable consequence and a known prevention. Naming them is how you spot a corner being cut before it is buried in your finished grid.
| Mistake | What it causes | The prevention |
|---|---|---|
| Deep grid on a short ceiling | Room reads low; coffers look like a cage, not recesses | Confirm the 9 ft threshold; proportion beam depth to the real height |
| Grid not laid out to the room | Thin partial coffers crashing into walls; beams missing windows | Chalk and balance the full grid; calculate spacing to the room's dimensions |
| Beams fastened to drywall alone | A heavy grid sags, opens joints, or pulls loose | Locate joists, add blocking, anchor every beam into structure |
| Joist direction ignored | Perpendicular beams with nothing to anchor into | Map joist direction first; add blocking between joists where needed |
| Wavy ceiling left as-is | Beams with uneven reveals; a grid that reads out of true | Shim or fur the plane flat before the beams go up |
| Real wood finished after assembly | Raw wood revealed at joints when the grid moves | Finish wood components before final assembly |
| Lighting an afterthought | No power in the coffers; cove or LED impossible without rework | Plan recessed or cove lighting with the grid, on paper, first |
Every row is a planning or structural decision made before the trim — which is why "we measure the height, map the joists, and balance the layout before we design the grid" is the most valuable sentence in a coffered quote.
Matching the Coffered Ceiling to the Room — and the Detail That Sets the Mood
The best coffered ceiling is matched to the room's height, proportions, and intended feel, and the design detail — not the beam alone — sets whether it reads formal or understated. Which is why buying off an inspiration photo alone lands a grid in a room that cannot carry it.
Rooms a Coffered Ceiling Transforms
It wins in rooms that are already generous and want a focal plane overhead — formal dining rooms, libraries and studies, primary bedrooms with ceilings tall enough to absorb the drop, and open-concept great rooms where the ceiling is the one surface big enough to organize the whole space. It pairs naturally with traditional and transitional interiors, but a clean, beam-only grid with no panel molding reads convincingly modern. The constant is proportion: a coffer grid sized to the room, with beam spacing that lands sensibly against walls and windows, looks intentional, while one stamped onto a room without that planning looks applied.
The Detail Inside the Coffer
Room context and intended formality override preference. A grid meant to read formal takes panel molding inside each coffer, a stained natural-wood finish, or concealed cove lighting; a grid meant to read modern stays beam-only with a flat painted recess. The finish — painted or stained — also picks the construction system before anything else, since a stainable wood grid forces real lumber. To weigh systems and looks spec-for-spec, the material comparison tool lines them up, and the surface selector helps confirm a coffered ceiling fits the room at all.
What Actually Drives the Cost of a Coffered Ceiling
A coffered quote is not a flat per-square-foot rate; the headline number hides the items below, ranked by how much they move the total. None is a dollar figure here — the point is to read a quote critically, not to guess a price.
The Cost Drivers That Move the Total Most
- Construction system and finish. The system and how it is finished set the baseline — a stained solid-lumber grid is far more material and skilled labor than a painted box-beam grid or a glue-up polyurethane kit, and the finish you want narrows the system before anything else.
- Grid complexity and layout. The biggest design swing. A simple square grid of large coffers is fewer beams and joints than a dense grid with crossing beams, panel molding inside each box, and a layout balanced to land symmetrically — every added beam is more cutting, fitting, and finishing.
- Structural work and blocking. Locating joists and adding blocking where beams run perpendicular is real labor a sound, correctly-oriented structure avoids — and a ceiling that needs reinforcement to carry a heavy grid changes the scope before a beam goes up.
- Ceiling preparation and flattening. A wavy or out-of-true ceiling has to be shimmed or furred flat so the beams land cleanly, the same way a subfloor is leveled before a floor — skipped, it shows as uneven reveals across the grid.
- Lighting integration. Recessed cans, cove lighting, or concealed LED in the coffers mean electrical work coordinated before the beams close the plane — cheap to plan in, expensive to add after.
- Ceiling height and access. A tall ceiling — the very height a coffered grid wants — means staging or scaffolding to work overhead safely, slowing the install and raising the labor beyond a standard-height room.
- Coffer interior detail. Plain painted recesses are quick; panel molding, wood-paneled coffers, or stepped trim inside every box multiply the millwork and the finishing hours across the whole grid.
- Trim, caulk, and finish-out. Crown or panel molding at every beam-to-ceiling and beam-to-beam joint, then caulking, filling, and painting the assembly as one piece of millwork, adds up across a full grid and is where rushed work shows.
Because these drivers swing so widely, the only honest number comes from an on-site assessment that measures the height, maps the structure, and prices the grid you actually want. Compare what moves the price across ceiling work in our cost guides, and read how each treatment is built in our guides so you can read a quote critically.
Get an itemized coffered scope, not a headline rate.
A vetted installer prices the system, the structural work, the layout, and the lighting as separate lines — so you see the whole grid, free and with no obligation.
Is a Coffered Ceiling Right for Your Space?
A coffered ceiling is not a preference you can simply pick — it is the output of a short chain of facts about your ceiling height, your structure, and the look you want. Walk the decision in order; each branch eliminates the options the room cannot support, and what survives is the right call.
- Measure your true ceiling height first. Is it at least 9 ft? A tall ceiling opens the full range of grid depths. A standard 8 ft ceiling eliminates a deep grid immediately — ask honestly whether the shallowest decorative grid is worth the lower feel, or whether a tray or flat treatment serves the room better.
- Decide painted or stained, because it picks the system. A clean painted grid is well served by lightweight hollow box beams or kits. A natural, stainable wood grid that can be refinished requires real lumber — and real lumber demands structure to carry it, which moves the next branch.
- Map what is above the ceiling. Locate the joists and confirm their direction. A real-lumber grid wants beams anchored into joists, with blocking added where they run perpendicular; a marginal structure or a parallel joist run points to added blocking or a lightweight system that forgives a weaker ceiling.
- Match the system to the structure and finish. Solid lumber for an authentic stained grid over sound structure; hollow box beams for a clean painted grid with less load; a polyurethane kit for a decorative result over a weaker ceiling or a shorter room. Confirm the system against the room under the ceilings hub.
- Balance the grid layout for the surviving system. Whatever system remains still requires the grid to be chalked and balanced so beams land symmetrically, align with the windows, and avoid thin partial coffers. If the ceiling is wavy, the prep step is shimming or furring it flat — regardless of which system you chose.
Run honestly, this tree almost always returns a single defensible system and grid — and an installer who applies one deep solid grid to every room regardless of its height is the red flag.
Talk through your project — free.
A free consultation and a written, itemized quote from a vetted installer. No pressure, no obligation.
How a Coffered Ceiling Is Built, Step by Step
A professional coffered build runs the same disciplined sequence every time, and each step exists to prevent a specific failure. The six steps below are the full arc from on-site assessment to final finish-out.
On-Site Height and Structure Assessment
The installer measures the true ceiling height, locates the joists and confirms their direction, checks the ceiling for dip and wave, and identifies any ducts, wiring, or lighting overhead. The system and grid are decided here against the Readiness Gate — not from a catalog photo — before any material is ordered.
Grid Layout and Balancing
The full grid is chalked onto the ceiling and adjusted until the beams land symmetrically against the walls, align with key windows and the room's center, and partial coffers at the borders are eliminated or balanced. Beam spacing, width, and coffer size are calculated to the room's real dimensions, so the pattern reads designed rather than applied.
Structural Prep and Blocking
Blocking is added between joists where beams will run perpendicular so every beam can anchor into structure rather than drywall, and the ceiling plane is shimmed or furred flat where it dips. A wavy ceiling is corrected here the way a subfloor is leveled, so the beams land on a true plane.
Primary Beams Into Structure
The primary beams are fastened first into the blocking and joists on the chalked layout, set level and true. For a solid-lumber grid they anchor directly into structure; for a box-beam grid the hollow boxes slip over fastened cleats; for a kit they glue and pin to the prepared plane. This is where the dead load is transferred safely.
Cross Beams and Coffer Interiors
Cross beams are fitted between the primaries to complete the grid's openings, then each coffer interior is finished to the design — left as painted drywall, dressed with panel molding, paneled in wood, or wired for concealed cove or recessed lighting that was located before the beams closed the plane.
Trim, Caulk, and Finish-Out
Crown or panel molding at the beam-to-ceiling and beam-to-beam joints hides the seams and sharpens the shadow lines, then the whole assembly is caulked, filled, and finished as a single piece of millwork. Real-wood components are finished before final assembly so movement never reveals a raw joint; the installer walks the grid with you to confirm the result.
Skip or rush any one of these six steps and the failure it was meant to prevent — a low feel, a crashing layout, a sagging beam, a striped joint — shows up later, which is why a vetted installer treats the sequence as fixed, not optional.
Coffered Ceiling Glossary
The terms below recur in every coffered quote, design drawing, and scope — each defined as its working meaning on an actual job site, so you can read a proposal and judge whether it is complete.
- Coffer
- A single recessed panel — the sunken box between the beams — usually finished flat, with panel molding, or with concealed lighting. The grid is a field of coffers; the box, not the beam, is what the word names.
- Beam (grid beam)
- The projecting member that borders the coffers in both directions, carrying the trim, depth, and visual weight. Built from solid lumber, a hollow box, or molded polyurethane depending on the system.
- Box beam
- A hollow three-sided beam, typically MDF or paint-grade, that slips over a fastened cleat or ledger — looks solid from below but weighs a fraction as much, the route for a painted grid.
- Coffered-look kit
- A pre-molded polyurethane or panel system that glues and pins to a flat ceiling to fake the depth of a framed grid — lightest and fastest, with the least true shadow and no stainable finish.
- Dead load
- The static weight a real-lumber grid adds overhead, which must transfer into the joists rather than the drywall — the structural number that decides whether a heavy grid can hang where you want it.
- Blocking
- Short framing members added between joists so a beam running perpendicular to the joists has solid structure to anchor into — the fix for a joist direction that fights the grid.
- Joist direction
- The way the ceiling joists run, which decides whether a beam can anchor directly into them or needs blocking added — mapped before the grid is designed, not discovered mid-build.
- Ledger / cleat
- A strip fastened to the ceiling that a hollow box beam slips over and fastens to — the hidden backbone that carries a box-beam grid into structure.
- Tray ceiling
- A single stepped recess that lifts the center of the ceiling, adding apparent height — the opposite move from a coffer, often the better call when the room cannot spare the drop a grid costs.
- Panel molding
- Decorative trim applied inside each coffer to add depth and formality — the detail that pushes a grid from understated to formal, distinct from the crown at the beam joints.
- Reveal
- The visible face and shadow line a beam shows from below — kept even across the grid by landing the beams on a flat plane, which is why a wavy ceiling is furred true first.
- Cove lighting
- Concealed LED set into a coffer or beam to wash the recess with indirect light — planned with the grid on paper, because the power has to be roughed in before the beams close the plane.
Standards, Workmanship, and When a Permit Applies
A coffered ceiling is a millwork-and-structure project, and the conditions that protect it are about how it was built, not a product warranty card.
Workmanship Conditions That Hinge on the Build
The conditions are specific and checkable: the grid balanced and chalked to the room; beams anchored into joists and blocking, not drywall; the ceiling furred flat where it dipped; real-wood components finished before assembly; joints caulked, filled, and finished as one piece. An installer who stamps a generic grid onto an unmeasured room, or hangs heavy beams off drywall, has built in a low feel or a sag before you notice. Ask in writing that the grid be laid out to the room and anchored into structure — that scope is what a workmanship guarantee is judged against, and one more reason the cheapest quote is rarely the cheapest grid.
The Trades That Set the Bar
Coffered work draws on finish carpentry for the millwork, framing for the structural attachment and blocking, and — where the coffers are lit — electrical for the lighting roughed in before the plane closes. A grid built with all three coordinated holds its shape and its shadow; one treated as trim-only, ignoring the structure and the lighting, is where the failures live. Structural questions about what the ceiling can carry belong with the framing side of ceiling installation first.
When a Coffered Ceiling Needs a Permit
Permits enter when the work goes beyond decorative millwork. A grid of lightweight box beams or a kit applied to a sound ceiling usually does not require one, but adding structural blocking that alters framing, integrating new electrical circuits for coffer lighting, or coffered work tied to a larger renovation often does. A reputable installer tells you when a permit applies rather than working around it. When an older grid has sagged or cracked, the better path may be diagnostic ceiling repair than a cosmetic patch over a structural problem.
A Real Coffered Ceiling Decision
One representative scenario shows why height and structure decide everything: the ceiling, not the catalog, drove every call below.
How to Vet a Coffered Ceiling Installer
A coffered ceiling is built, not bought, so the installer matters more than the beam stock. These questions separate a crew that builds a grid to last and read designed from one that simply stamps a pattern overhead.
- They measure the height and proportion the grid before quoting
- An installer who commits to a deep grid without measuring the ceiling is guessing at the feel. Ask what beam depth they recommend for your height and why — a real answer names the 9 ft threshold and proportions the depth to the room.
- They map the joists and explain the attachment
- Ask how the beams anchor and where the blocking goes. A credible answer locates the joists, names blocking for perpendicular beams, and anchors into structure — not into drywall and hope.
- They balance the layout to the room, not a template
- The right installer chalks the full grid and shows you how it lands symmetrically, aligns with the windows, and avoids thin partial coffers. A one-grid-for-every-room shop is a red flag.
- They match the system to your ceiling and finish
- Solid lumber, box beam, or kit should be chosen for your height, structure, and whether you want stained or painted — and the headroom each costs explained before work begins, in writing.
- They coordinate lighting and finish the grid as millwork
- Ask whether coffer lighting is planned with the layout, how joints are caulked and finished, and whether wood is finished before assembly. The seams and the shadow lines are where rushed work shows.
- They put the scope and a workmanship guarantee in writing
- Ask for the full scope, the system, the structural work, and the labor warranty in writing before work starts. A crew willing to name a workmanship guarantee — and to return if a joint opens or a beam sags — is accountable for the build, not just the trim.
Why Route Your Coffered Ceiling Through Pro Work Home Surface
Pro Work Home Surface is not a contractor and does not build your ceiling — we are a national authority on home surfaces that matches homeowners with vetted local installers and holds them to a published bar.
- A free consultation and an itemized written scope
- Every connection starts with a no-obligation consult and a written quote that lines out the system, the structural work, the layout, and any lighting separately — so you read the whole grid, not a headline rate.
- A real vetting standard, applied before we connect you
- Installers are screened on what decides a coffered ceiling: whether they measure the height, map the joists, balance the layout to the room, and anchor beams into structure rather than stamping a generic grid overhead.
- Layout and structure before beams, every time
- The grid is chalked and balanced to the room and the joists are located with blocking added where beams run perpendicular, so every beam anchors into structure and the pattern lands symmetrically — not crammed or crashing into the walls.
- National coverage, local crews
- We match you with installers in your area nationwide, so the standard is consistent even though the crew is local — whether your project is one formal room or a whole-home grid.
Ceilings are one of eight categories we cover across home surfaces. If your project also touches a feature wall below, a plank-and-beam wood ceiling in an adjoining room, a faster coffered-look panel route, or full ceiling installation, the same standards apply — compare what moves the price in our cost guides, dig into how each ceiling is built in our guides, weigh systems with our comparison tools, and start from the ceilings hub or the full range of home surfaces.
Brands & Material Authority
Quality and construction drive long-term performance more than the label. These are widely respected names in this category:
- Armstrong
- USG
- CertainTeed
- Genesis
- ACP