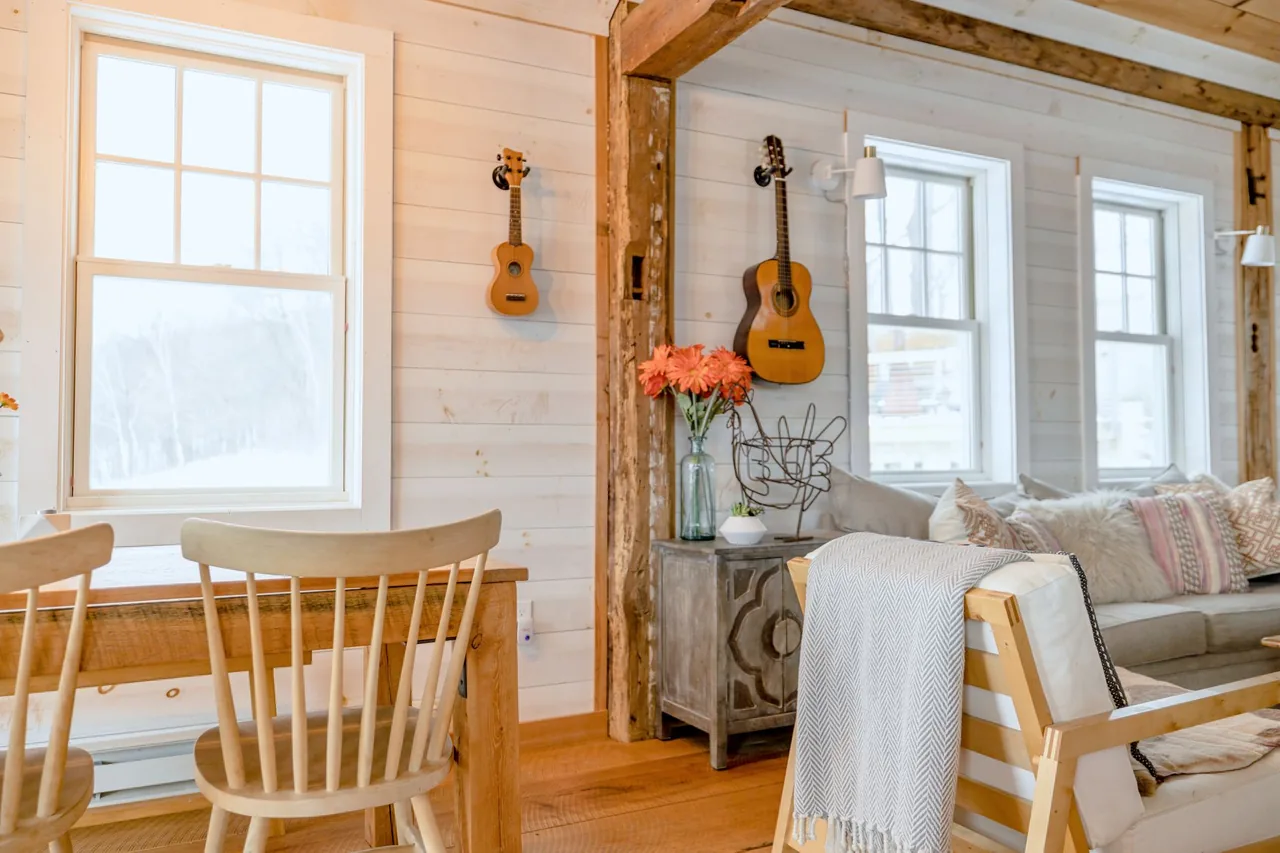
Shiplap is wood wall cladding milled with an rabbet — an L-shaped notch run along each edge — so every board overlaps the next and leaves a clean, even shadow line between them. Two things decide whether a shiplap wall reads built-in or reads like a weekend project, and almost nothing else does: whether the wood was dry enough before it went up, and whether every seam is the same width, dead level, and fastened into solid framing. Hit a stable moisture content and hold a uniform reveal and the wall stays tight for decades; miss either and it gaps by February or bows off the wall. Boards run about 3/4" thick, and that overlapping rabbet is what separates true shiplap from plain butt-jointed planks. Get a free consultation and a written, itemized scope from a vetted carpenter before a single board is ordered — that document is where a lasting wall is decided.
Shiplap Is a Moisture-and-Reveal Material First, a Board Second
The board everyone photographs matters least to whether the wall lasts. What separates a shiplap wall still tight in ten years from one that opens at the seams is the moisture work done before the first board and the reveal discipline held during install.
The Rabbet Does Two Jobs at Once
The name comes from boat building, where overlapping rabbeted planks made a tight, weather-shedding hull. On a wall the rabbet earns its keep two ways, which is why a credible carpenter starts from the profile, not the paint:
- It lets each board sit partly behind the one above, so the assembly reads as a continuous surface rather than a stack of loose planks.
- It gives the installer a built-in registration edge, so the boards self-align as they climb the wall.
- It creates the signature shadow line — the crisp reveal a flat wall can never throw.
That overlap is also why shiplap is constantly confused with two look-alikes — and the difference changes how the wall installs and what it costs.
Shiplap, Tongue-and-Groove, and Nickel-Gap Are Three Different Profiles
Tongue-and-groove uses an interlocking profile that hides the seam entirely and gives a tighter, flatter face; nickel-gap is a shiplap variant milled to leave a precise, narrow reveal without a spacer. True shiplap sits between them — overlapping, self-aligning, and showing a deliberate shadow line. All three deliver a plank-wall look, but only shiplap and nickel-gap show the gap that most people actually mean when they say "shiplap." Naming the profile correctly is the first step to buying the right board.
Where the Shadow Line Genuinely Wins
Where shiplap beats every alternative is texture and rhythm. A painted shiplap wall throws a horizontal line every few inches that flat drywall cannot produce, which is why it carries an accent wall so well and reads as the defining surface of a living-room feature wall. It suits entryways, mudrooms, stairwell walls, and the headboard wall of a bedroom, where the cadence of the lines does the decorating. Run horizontally it widens a room; run vertically it lifts a low ceiling; run diagonally it becomes a deliberate statement. The boards also bridge minor wall waves a rigid flat panel would telegraph — a quiet, real advantage on older walls.
Where Shiplap Fails — Moisture, Movement, and the Wrong Room
Shiplap is wood, and wood moves with the moisture in the air around it. That single fact drives every real failure — each one preventable before a board goes up.
Seasonal Gapping From Wood Installed Too Wet
Across its width a board expands when humidity rises and shrinks when the house dries out in the heating season. If it was nailed before it reached the home's actual humidity, the shrinkage opens the seams unevenly or splits the board at the fasteners. This is the most common disappointment: a wall that looked perfect in summer shows ragged gaps by winter. The fix is acclimation, not a different board — the wood has to sit in the conditioned room until it stops moving, then go up.
The Wrong Room — Steam, Splash, and Standing Damp
Solid-wood shiplap in a steam-filled shower or an unconditioned three-season porch will cup, swell, and eventually rot, because no paint film fully stops vapor over years of wet-dry cycling. A bathroom with a working fan and ordinary splash is usually fine above the wet zone; a direct shower surround is not shiplap territory — that is wall tile over a waterproofed substrate. Matching the board to the room's moisture is the call that keeps wood where wood survives.
Reveal and Fastening Errors — Purely an Install Problem
The third failure is cosmetic and entirely about craft: gaps that wander, boards that aren't level, and fasteners that missed the framing and let a board bow off the wall. A reveal that drifts even a sixteenth across a long wall announces itself under daylight, and the very first board sets the angle for every board above it. None of these are defects in the wood; they are the difference between a careful crew and a fast one.

Shiplap vs. the Other Ways to Get a Plank or Feature Wall
Shiplap is one route to a textured wall, and the right choice depends on the look, the room, and the budget — not on which is trendiest. The matrix below sets shiplap against the finishes it actually competes with, rated on the specs that decide the call.
| Finish | Signature look | Moisture tolerance | Real wood? | Install effort | Best use |
|---|---|---|---|---|---|
| Shiplap | Horizontal shadow line | Dry & above-splash only | Yes (or primed MDF) | Moderate — finish carpentry | Painted feature & accent walls |
| Wood wall panels | Slat, sheet, board-and-batten | Dry; engineered handles damp better | Yes | Varies sharply by format | Slat texture, fast coverage, acoustics |
| Wainscoting | Lower-wall millwork + cap rail | MDF dry; PVC for damp | Yes / MDF | Moderate — layout-driven | Protecting & finishing the lower wall |
| 3D wall panels | Sculpted relief, fluted, acoustic | PVC tolerant; MDF/gypsum dry | Sometimes | Fast — often adhesive | Modern texture & sound control |
| Plain drywall | Flat, paintable background | Standard dry; MR board for damp | No | Skill-driven finishing | The default for most walls |
The honest read: shiplap is what you add when a wall needs to be the focal point, not the background — a deliberate upgrade over flat drywall, a warmer choice than 3D panels, and a different look than slat or wainscoting. If you are weighing the whole category against itself, the guides walk through which wall finish fits which room before you commit.
Not sure shiplap is the right finish for this wall?
Tell us about the room and we'll match a vetted carpenter who compares shiplap against the alternatives for your space — and explains why the others don't fit, in writing.
The Specs and Standards That Decide Shiplap Quality
Shiplap has no single durability rating the way tile has PEI, but a handful of measurable specs separate a wall that ages well from one that warps or splits — from the species and its moisture content through board dimensions to the reveal and any fire requirement.
Species and Moisture Content
Most paint-grade shiplap is pine or another softwood; clear-finished walls use cedar, oak, or a comparable species where the grain is the point. What matters far more than species is that the boards are dry.
Reading Moisture Before the Boards Go Up
Kiln-dried stock at a stable moisture content is the non-negotiable, ideally read with a moisture meter before install so the wood isn't going to shrink on the wall. The target is equilibrium with the home, not a fixed number — wood that reads close to the room's long-run humidity has already done most of its moving.
Why the Reading Has to Match the Room, Not the Warehouse
A board acclimated to a humid lumberyard and nailed up in a dry, heated house will shrink after install no matter how "dry" the warehouse felt. The reading that matters is taken in the conditioned room the wall lives in, with the HVAC running at normal living conditions.
The Spread That Predicts Gapping
Practitioners look for a small spread between the boards and the room's equilibrium moisture content before fastening. A spread too wide means the wood is still exchanging moisture with the air — the gradient that opens seams over the first heating season. Closing that spread on site is exactly what acclimation buys.
Board Thickness, Width, and Grade
Typical shiplap is around 3/4" thick in nominal 6" or 8" widths. Wider boards mean fewer seams and a cleaner look but move more across their width, so they demand more careful acclimation. Grade follows the finish: paint-grade boards can carry knots and minor defects you'll cover with primer and paint, while stain- or clear-grade boards are selected for grain and cost more because the wood itself is the finish.
The Reveal — the Visible Mark of Quality
True nickel-gap is milled to a fixed reveal; plain shiplap relies on a spacer at install. A consistent gap — whatever its width — is the single visible mark of quality, more than the brand on the bundle. The reveal is what the eye reads first, and a wandering one is the fastest tell of a rushed job.
Fire Performance Where Code Applies
In some applications a flame-spread class — the ASTM E84 rating — matters, particularly running wood up a stairwell or where local code governs combustible wall finishes. It rarely drives a typical accent wall, but it is worth confirming before cladding an egress path. A vetted carpenter raises it when the location calls for it rather than discovering it at inspection.
Grades and Formats — What to Actually Buy
Shiplap reaches you in a few distinct forms, and matching the form to your skill, room, and finish saves both money and regret. Unlike a category such as hardwood flooring with named species leaves, shiplap is bought by format and grade rather than by a sub-page per type.
The Four Forms, Compared
The table below lays out what each form is, what it tolerates, and where it belongs — the comparison that prevents buying MDF for a bathroom or paying for cedar on a painted wall.
| Form | What it is | Moisture tolerance | Finish | Best for |
|---|---|---|---|---|
| Primed MDF shiplap | Pre-primed fiberboard, dead-straight | None — dry rooms only | Paint only | Budget, paint-grade dry walls |
| Solid softwood (pine) | Real wood, knots available | Above-splash with the right primer | Paint, repairable | Most painted feature walls |
| Hardwood / cedar | Stain-grade real wood | Cedar tolerates damp better | Stain or clear coat | Walls where grain is the point |
| Nickel-gap boards | Milled to a fixed reveal | Per the species chosen | Paint or stain | Guaranteed even shadow line |
Whatever you buy, the brand on the bundle matters far less than the moisture content and the install. Cost factors — species, grade, board width, and how much wall you are covering — are worth comparing in the cost guides before you order, and the material comparison tool lines the wall finishes up spec-for-spec.
Want the boards acclimated and fastened into framing — not glued to drywall?
We match you with a vetted carpenter who reads moisture, adds blocking where studs don't fall, and holds a uniform reveal — so the wall stays tight through the seasons.
How Shiplap Is Installed
Shiplap installation is fast for a careful crew and unforgiving of shortcuts, because every error is permanent and visible. The six steps below are the full arc from acclimation to finished corners, and each exists to prevent a specific failure.
Acclimate the Boards in the Room
Solid-wood boards sit in the conditioned space, often unbundled, until their moisture content stabilizes with the home's humidity — the step that spends seasonal movement before the wall, not after. The HVAC runs at normal living conditions so the wood acclimates to the room it will actually live in.
Locate Framing and Snap a Level Line
The installer finds the studs, marks them, and snaps a dead-level reference line for the first board, accounting for floors and ceilings that aren't true. Every board above inherits the first board's angle, so this line is the whole wall's foundation.
Add Blocking Where Studs Don't Fall
Where the layout leaves a board with nothing solid behind it, blocking goes in behind the drywall so every board hits real wood. Boards anchored to bare drywall alone bow off the wall as the wood moves — the structural attachment is what keeps the face flat for years.
Set the First Board and Blind-Nail the Overlap
The starter board is set to the level line, then fastened through the rabbet so the next board hides the nail — a blind-nail technique that leaves a clean face. A consistent spacer, or the milled nickel-gap, holds the reveal uniform from the first seam.
Climb the Wall, Stagger the Seams
Boards go up course by course, each registering on the one below, with end seams over a long wall planned to land on a stud and stagger rather than stack. A hairline allowance at the ends leaves the wood room to expand instead of buckling.
Resolve Corners, Trim, and Finish
Outside corners are mitered or trimmed; inside corners and edges are finished with trim; nail holes are filled and the wall is primed and painted, or the protective finish is applied to stained boards. This stage is where separate boards read as one built-in wall.
Two details separate professional work: fastening into solid wood so boards never bow off the wall, and leaving the wood room to move so seasonal expansion is absorbed instead of buckled. This is finish carpentry, and it overlaps with general wall installation when framing or blocking has to be added behind the boards first.
Common Shiplap Mistakes, Consequences, and Prevention
Most shiplap disappointments are the same handful of shortcuts, each with a predictable consequence and a known prevention. Naming them is how you spot a corner being cut before it is nailed to your wall.
| Mistake | What it causes | The prevention |
|---|---|---|
| No acclimation | Seams open unevenly over the first heating season | Let boards reach equilibrium in the conditioned room before fastening |
| First board not level | The whole wall runs out of true, visibly | Snap a dead-level line and set the starter board to it |
| Glued to bare drywall only | Boards bow and pull off the wall as wood moves | Fasten into studs or added blocking, adhesive as a supplement |
| Inconsistent reveal | Wandering gaps that announce a DIY job | Use a uniform spacer or milled nickel-gap throughout |
| MDF in a damp room | Swelling and crumbling at the base | Keep MDF dry; use solid wood above splash, tile in the wet zone |
| Boards jammed wall-to-wall | Buckling and tented seams when the wood expands | Leave a hairline allowance at the ends for movement |
| Wood run into a shower | Cupping, swelling, and rot behind a painted face | Stop wood above the wet zone; tile the surround |
Every row is a problem you can see coming in the quote — which is why "we acclimate, fasten into framing, and hold a uniform reveal, in writing" is the most valuable sentence a carpenter can offer.
The Shiplap Fit Test: Six Questions Before You Buy
Before a board is ordered, run the wall through the same six-question fit test a careful carpenter uses. Each question has a measurable or material answer, and a wall that fails one points to a different board, a different room, or a different finish entirely.
- 1. How much moisture does the room see?
- Dry living spaces and bedrooms take any shiplap, including budget MDF. A bathroom with a fan can take solid wood above the splash zone. A shower surround takes none — that is a tile-and-waterproofing job. The room's moisture decides the material before anything else.
- 2. What direction solves the room?
- Horizontal widens a narrow room and reads classic; vertical makes a low ceiling feel taller; diagonal is a bold statement that costs more in labor and waste. Choose the orientation for the effect you want, then buy enough for the cut pattern.
- 3. Paint or stain?
- If you're painting, paint-grade pine or primed MDF is the smart spend. If you want stain or a clear coat, pay for stain-grade hardwood or cedar — the wood itself is now the finish, and grade shows.
- 4. Is there time to acclimate?
- Solid wood needs lead time to reach equilibrium in the room. If the schedule can't allow it, dimensionally stable primed MDF on a dry wall is the lower-risk call than rushing real wood onto the wall wet.
- 5. Will the boards hit framing?
- Plan where the studs fall and where blocking is needed, because a board with nothing solid behind it will bow. A wall that can't take blocking changes how — and whether — the boards get fastened.
- 6. How wide should the boards be?
- Narrow boards mean more seams and more rhythm; wide boards mean fewer seams and more movement to manage. Match the width to the look you want and the acclimation you can commit to.
Run honestly, the fit test usually returns a single defensible board, room, and finish — and a shop that recommends the same shiplap for every wall regardless of the answers is the red flag.
Is Shiplap Right for Your Wall?
The decision isn't a preference — it's the output of a short chain of facts about the room, the moisture, and the finish you want. Walk it in order; each branch eliminates the boards the wall can't carry, and what survives is the right call.
- Is the wall in a wet zone? A shower surround or a constantly wet wall rules shiplap out entirely — go to wall tile over waterproofing. A dry or above-splash wall keeps shiplap on the table.
- Painting or showing the grain? Painting opens primed MDF (dry rooms) and paint-grade pine. Wanting visible grain narrows it to stain-grade hardwood or cedar, and rules MDF out — its printed-free face has no grain to show.
- Can the boards acclimate? If the schedule allows lead time in the conditioned room, solid wood is safe. If it can't, and the wall is dry, stable MDF is the lower-risk choice than nailing real wood up wet.
- Where does the framing fall? Confirm the studs and where blocking is needed so every board hits solid wood. A wall that can't take blocking points to a different attachment plan or a different finish.
- What direction and width? Set the orientation by the room's proportions and the board width by the look and the acclimation you can commit to. Buy enough for the cut and waste pattern of that choice.
Run end to end, this tree almost always returns one defensible board for one specific wall — and the answer is rarely "the same product the showroom photo used."
What Actually Drives the Cost of a Shiplap Wall
A shiplap quote is not a flat per-square-foot rate; the headline number hides the items below, ranked by how much they move the total.
- Material grade and species. Primed MDF, paint-grade pine, and stain-grade hardwood or cedar sit at very different price points — the wood itself is the first and biggest lever.
- Wall area and ceiling height. A full floor-to-ceiling feature wall is far more board and labor than a single accent panel, and tall walls add staging and cut time.
- Orientation and pattern. Diagonal layouts add cutting, waste, and skilled hours beyond a straight horizontal run; vertical needs different blocking and planning.
- Blocking and framing prep. Walls that need blocking added behind the drywall so boards hit solid wood are real labor a stud-friendly layout avoids.
- Finish — paint vs. stain. Priming and painting is one cost; a stained or clear-coated wall on stain-grade wood is more material and more careful work.
- Trim, corners, and outlets. Mitered outside corners, finished inside corners, and clean cuts around outlets and switches add exacting hours across the wall.
- Removal and wall repair. Taking down an old finish, or patching the wall behind it before cladding, can change scope once the wall is opened up.
Because these drivers swing widely, the only honest number comes from seeing the wall. Compare what moves the price across the category in our cost guides so you can read a quote critically.
Want a board matched to your room, not a showroom photo?
We match you with a vetted carpenter who reads the wall's moisture, names the right board and finish, and puts it in a written, itemized scope — before you order a single plank.
Caring for a Shiplap Wall
A painted shiplap wall is low-maintenance, but the gaps that give it character also collect dust, so care is mostly about the reveals. Dust the horizontal ledges every few weeks with a microfiber cloth or a soft brush vacuum attachment; the shadow lines hold more dust than a flat wall. Clean painted shiplap with a barely damp cloth and mild soap — never soak it, because standing water can seep into the seams and swell the wood. Touch up paint where scuffs appear; one advantage of real wood is that it sands and repaints cleanly, so a shiplap wall can be refreshed in a new color for decades. For stained or clear-finished boards, refresh the protective finish on schedule and keep the room's humidity stable, since wide seasonal swings are what reopen seams. If a board ever splits, cracks, or a seam gaps badly, it can be patched or swapped — see wall repair.
Talk through your project — free.
A free consultation and a written, itemized quote from a vetted installer. No pressure, no obligation.
Shiplap Glossary
The terms below recur in every quote, spec sheet, and product listing — each defined as its working meaning on an actual job, so you can read a scope and judge whether it is complete.
- Rabbet
- The L-shaped notch milled along each board edge that lets shiplap boards overlap and self-align, creating the signature shadow line. It is the profile that defines true shiplap.
- Reveal
- The visible gap between boards. A uniform reveal — held by a spacer or milled into nickel-gap — is the single most visible mark of a quality install.
- Nickel-gap
- A shiplap variant milled so the overlap leaves a precise, narrow reveal automatically, removing the need for a spacer and guaranteeing an even shadow line.
- Tongue-and-groove
- An interlocking board profile that hides the seam for a tighter, flatter face — a different look from shiplap's deliberate gap.
- Moisture content
- How much water the wood holds, read with a meter. Boards near equilibrium with the room's humidity have done most of their moving and stay tight after install.
- Acclimation
- Letting the boards sit in the conditioned room until their moisture content stabilizes with the home, so they stop moving after they are on the wall.
- Studs
- The vertical framing members behind the drywall. Shiplap fastens into studs (or added blocking) for a structural hold, never to bare drywall alone.
- Blocking
- Short framing added between studs so every board has solid wood to fasten into where a stud doesn't fall — the fix for boards that would otherwise bow.
- Blind-nailing
- Fastening through the rabbet so the next board hides the nail, leaving a clean, fastener-free face — the technique that makes shiplap read seamless.
- Paint-grade vs. stain-grade
- Paint-grade boards allow knots and minor defects to be hidden under paint; stain-grade boards are selected for grain because the wood is the finish. The choice follows whether you paint or stain.
- Flame-spread
- A combustibility rating (ASTM E84) that can govern wood wall finishes on stairwells and where code applies — worth confirming on an egress path.
- Expansion allowance
- The hairline gap left at board ends so the wood can expand with humidity without buckling. Boards jammed wall-to-wall tent at the seams the first humid season.
Standards, Finish Quality, and When Wood Is the Wrong Call
Shiplap isn't governed by a single product warranty the way a manufactured floor is — its longevity is a function of the install and the room, which is exactly why the standards below are about practice, not a brand promise.
The Install Conditions That Decide Longevity
The conditions are specific and testable: the boards acclimated to the room's humidity before fastening; a structural attachment into studs or added blocking rather than adhesive on bare drywall; a uniform reveal held the length of the wall; and a hairline expansion allowance at the ends. A wall built to those holds tight through the seasons; one that skips acclimation or fastening opens or bows no matter how good the board was. Ask in writing that the work follow those practices — that is what a tight wall is actually judged against.
When Shiplap Is the Wrong Material
The clearest standard is knowing where wood doesn't belong. A direct shower surround, a constantly damp wall, or an unconditioned porch are tile or moisture-tolerant-panel territory, not shiplap. A reputable carpenter redirects those walls rather than forcing wood into them — and where the surrounding walls need taping, mudding, or texture, that is wall finishing and texturing, handled alongside the shiplap rather than under it.
A Real Shiplap Decision
One representative scenario shows why room and moisture drive the call: the same homeowner wanted shiplap in two very different spaces, and the material — not the look — changed between them.
How to Vet a Shiplap Installer
Shiplap is finish carpentry, so the installer decides the result far more than the brand of board. These six questions separate a carpenter who builds a wall to last from one who simply nails boards up fast.
- They acclimate the wood before they fasten it
- Ask how long the boards will sit in the room and whether they check moisture. A real answer names acclimation to the home's humidity and a meter reading — not "they're dry from the store."
- They fasten into framing, not just drywall
- Ask how they handle spots where no stud falls. A credible answer is adding blocking behind the drywall so every board hits solid wood — a glue-only shop is a red flag.
- They set the first board dead level
- Ask how they establish the starting line. A straight wall begins with a snapped level line and a starter board set to it, because every course above inherits its angle.
- They hold a uniform reveal
- Ask how they keep the gaps even — a consistent spacer or milled nickel-gap. A wandering reveal is the most visible sign of a rushed job, and a good carpenter controls it deliberately.
- They match the board to the room's moisture
- The right installer keeps MDF in dry rooms, puts solid wood above splash with the correct primer, and redirects a shower surround to tile — rather than forcing wood where it will rot.
- They put the scope and finish in writing and stand behind it
- Ask for the board spec, the orientation, the finish, and a workmanship guarantee in writing before work starts. A crew willing to return if a seam opens or a board bows is accountable for the install.
Why Route Your Shiplap Project Through Pro Work Home Surface
Pro Work Home Surface is not a contractor and does not install your wall — we are a national authority on home surfaces that matches homeowners with vetted local carpenters and holds them to a published bar.
- A free consultation and an itemized written scope
- Every connection starts with a no-obligation consult and a written quote that lines out the board, the finish, blocking, and trim separately — so you read the whole job, not a headline rate.
- Acclimate before you fasten, every time
- Solid-wood boards sit in the conditioned room until their moisture content stabilizes, so seasonal movement is spent before the boards go on the wall — not after, when it opens the seams.
- Fasten into framing, level from the first board
- Boards are nailed into studs or added blocking, never anchored to bare drywall alone, and the starting board is set dead level so every course above reads true with a uniform reveal.
- Right board for the room's moisture
- MDF stays in dry rooms, solid wood goes above splash zones with the right primer, and a shower surround is redirected to tile — the material is matched to the moisture, not forced.
Shiplap is one finish within eight categories we cover across home surfaces. If your project also touches wall finishing or texturing on the surrounding walls, the same standards apply — compare what moves the price in our cost guides, dig into which finish fits which room in our guides, line the options up with our material comparison tool, explore related vertical surfaces like ceilings, and start from the walls hub or the full range of home surfaces.
Brands & Material Authority
Quality and construction drive long-term performance more than the label. These are widely respected names in this category:
- James Hardie
- Metrie
- USG
- Sherwin-Williams
- Armstrong
- DPI